Making Patchwork Pillow Covers: A Timeless Technique for a Bold New Look
Share
Years ago when Scott and I had our old house decorated in what you would describe as “classic contemporary”, we accumulated about 8 different really nice quality feather throw pillows. As the years went by we redecorated and updated the house to be more mid-century-modern and all these luxuriously plush pillows were relegated to the upstairs TV area or one of the 3 storage closets because of their ugly brown and red and tan covers.
Now, we have moved into the baby house and our only couch is our 1958 Flexsteel sofa.
It is wonderful and I love it, but let’s be honest- Furniture in 1958 was not the most comfortable. So an idea struck, why don’t I make new pillow covers for all those plush feather pillows we have stuffed in a box? Surely a pile of soft feather throw pillows will make the living room much more comfortable and inviting. It was actually this idea that prompted my seeking out a vintage sewing machine and reacquainting myself with the hobby after a years-long break.
After finding the right sewing machine and getting acquainted with it over a couple small projects, I settled on a random patchwork idea for the pillow covers. I wanted to be able to mix all sorts of patterns and colors together to make a unique look. I’ve also always been interested in making a quilt so I thought this would be a great way to practice on a smaller scale. After spending several hours online searching for ideas this tutorial by Brett Bara is the one I kept coming back to. She uses “HSTs” or Half Square Triangles which I was already vaguely familiar with from the pin cushion, however the exact execution is different and in my opinion better. She also walks you through putting in a zipper which I thought sounded difficult at first, but, after watching her decided to try.
Having finally come to a decision on the execution of these pillow covers it was off to the fabric store. Scott went with me to JoAnn, the only store I knew had a good selection of quilting cottons, and we chose 2 prints and 2 solids that coordinated. A second trip to the other JoAnn in town yielded 3 more fabrics to round out the selection for all the living room pillows.
First thing is cutting the fabric into these perfectly identical triangles with special attention being paid to the direction of the patterns. This task is almost insurmountable if you do not have the right tools. Once you have the right setup though you will be able to easily make consistent and precise cuts. Precision at the cutting mat is key to patchwork and quilting and the more accurate you are now, the more polished your finished work will be.
Here is an excellent rotary cutting set almost identical to what I use. It consists of a rotary cutter, cutting mat, and clear quilting ruler and before you decide you can make do with some junk you already have I’m telling you- Save your time, energy, and frustration and just buy the right tools. I have learned the hard way so you don’t have to! Another note is if you already have a rotary cutter but are still having a hard time getting those laser-straight cuts, try swapping out your blade for a new one. Unlike fabric scissors rotary cutters still get dull over time, even if you’ve only used them to cut fabric.
The next step is deciding how you will mix and match and these different patterns and colors into something interesting. Since I wanted a random look I started indiscriminately joining about half of my triangles and pressed them out into their resulting squares. From there I arranged a little to get a feel for how the piece was going to look and assessed which fabrics I would like to add more of. I then more strategically joined the remaining triangles and pressed them out.
Once I had all the squares completed for one pillow side I arranged and rearranged and overthought it and raked all the squares out in the floor and started over at least 40 times. I wondered why I even started this project, why I ever thought these fabrics went together, who would want a homemade pillow cover anyway, does this even go with this room?! ALL OF IT. The full range of self-doubt all happened at that stage for me (LOL). But then something magical happened- I walked away, went to the bathroom or something, came back and I absolutely loved what I saw, just as it laid. I tweaked a square or two, but, it is amazing how a short break and a fresh glance can reset your perspective and confidence.
From there it’s smooth sailing- You join each row of squares together, press, then join the rows together. If you were accurate with your cuts and vigilant about your seam allowances everything should pretty well line up. But if you are a beginner and things don’t quite line up, that’s okay! They don’t need to be perfect and your accuracy will improve quickly as you continue to use your tools, techniques, and sewing machine.
Now at this point in the video tutorial Brett cuts a plain back for her pillow cover, puts in the zipper and closes them up. But since my pillow forms are filled with feathers, I wanted some additional layers in my pillow cover to keep the feathers from poking through (something I hated about the old pillow covers). I quilted together the top, cotton batting, and muslin backing to create this raw edged, miniature quilt. And since I wanted to be able to throw my pillows down any old way and they always look good, I made 2 completed sides for each pillow, no plain back.
After finishing both sides to each pillow, quilting and all, they were ready to be put together. Brett’s tutorial about installing the zipper is flawless and I got a perfect result my very first try. I had never done a zipper before and was quite pleased with myself when it turned out so well! I reused the zippers from the old pillow covers so less to buy and they were already the exact length needed. I had to buy a zipper foot for my sewing machine and I’m so glad I did. A universal one from eBay for $8 is what I got and it worked perfectly and made installing the zipper a breeze.
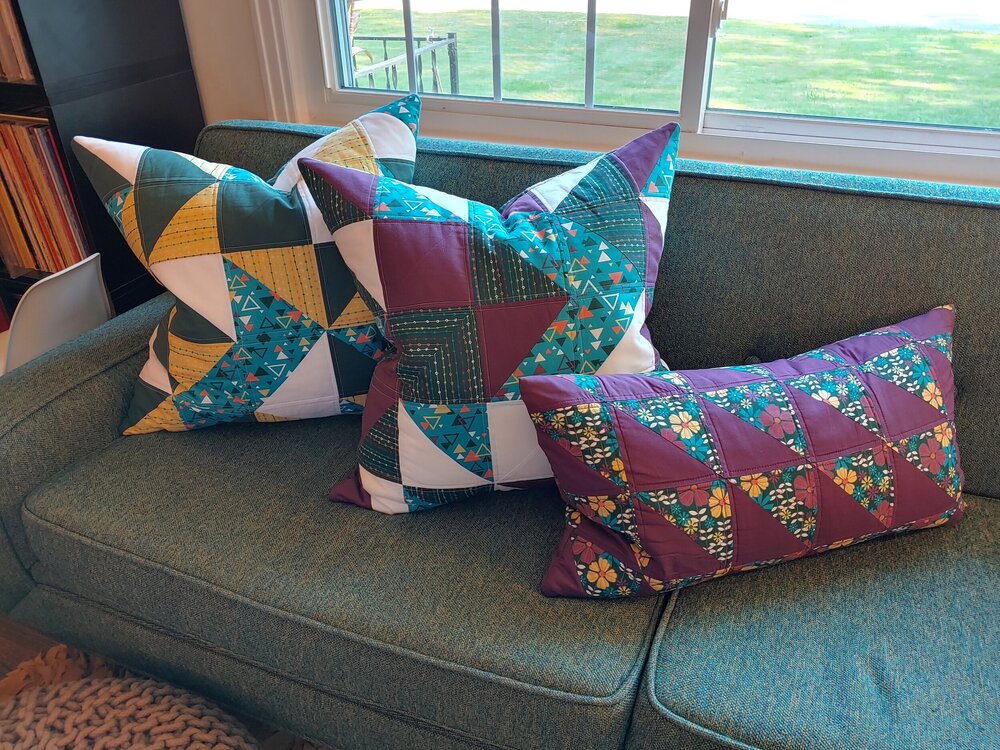
I’m in love with the finished look of these pillows! I was able to tailor each one to be a special piece all on its own but still coordinate with the collection. I don’t know that I would ever make the exact same one twice- When you spend so much time with something it is hard not to see it as a little work of art. The larger ones were 105 individual pieces each, the smaller floral pillow was 84 pieces. (I can only imagine how people who make large intricate quilts must feel!) But the end result is worth it. It can be extremely difficult to find fabric that truly coordinates with all aspects of your room. With a patchwork like this you can combine many fabrics that coordinate with various things to create something that exactly matches your entire space.
Oh and BTW, they are just cotton so you can toss them in the washer when they get gross. :-)